Migrating from OneNote to Obsidian
Tidying up after the importer so you can actually find things

Graph view after adding some index notes. You’ll get something like this in Navigation.
Introduction
My OneNote notebook had grown to a considerable size — hundreds of notes across dozens of sections. Work projects, developer reference, learning notes, personal stuff. At that scale, OneNote search was unfit for purpose. Finding text on a page you already had open was fine. A global search across notes, sections, and notebooks was particularly poor: slow, noisy, and unreliable enough that I stopped trusting it. I already needed to know roughly where a note lived. If I couldn’t remember the notebook or the section, I’d get a swamp of results and spend time hunting anyway. Remembering the filing cabinet on top of the actual content rather defeated the point of keeping notes in the first place.
This article walks through moving a notebook like that into Obsidian. The Obsidian Importer will copy the text over. It will not leave you with something nice to use. Most of the work is the tidy-up: images in a pile, messy formatting, tags, and a few index notes so you can find your way around.
There’s a section at the end on setting the vault up so an artificial intelligence (AI) assistant can read it too. That’s optional. You can stop when the vault is in decent shape.
I wrote about stuffing notes into a second brain in my review of Building a Second Brain. OneNote did that job for years. Two things eventually bothered me.
Search. OneNote’s global search — across notes, sections, and notebooks — is particularly bad. Once you have a few hundred notes, it isn’t a search box. It’s a prompt to remember which notebook you filed something in. That’s not a second brain. That’s a filing cabinet with a worse Ctrl+F.
Files you can actually open. Markdown is just text on disk. Any tool can read it, including an AI assistant with access to the folder. OneNote’s format and API (application programming interface — the official way other programs are supposed to talk to it) don’t really allow that. That’s what the last section is about, if you want it.
Intended Audience
Anyone with a large OneNote notebook who wants it in Obsidian in a state they can actually use. You don’t need to know Obsidian already. You should be happy installing a desktop app, signing into a Microsoft account, and moving files around.
If you’re already in Obsidian and only care about the AI bits, skip to Using the vault with AI tools.
What You’ll Need
You don’t need extra plugins or git for the main steps. They come up at the end if you want them.
Export in phases
- Create a new vault in Obsidian. Use an empty folder. Don’t import into a vault you already care about until you’ve tried this on a copy.
- Settings → Community plugins → turn off Restricted mode → Browse → install Importer. Enable it.
- Open the Importer command (
Importer: Open importer) and choose OneNote. Sign into the Microsoft account that holds the notebook. - Export one section, or one small notebook, at a time rather than the whole lot in one go.
If you try to export a huge notebook in one sitting, Microsoft’s API will often stall or time out. Mine was hundreds of notes across dozens of sections. Doing it in several passes was the only way I got everything across.
When a pass finishes, glance at the folder. You should see markdown files nested under something like OneNote/<Notebook name>/, plus a pile of image files. If a section comes through empty, run that section again before moving on.
Leave OneNote where it is until you’ve used the vault for a week or so. The importer copies. It doesn’t delete. You can always go back.
Recognise a raw import
Before you change anything, have a poke around and jot down what you see. The importer copies text. The rest is leftover OneNote clutter. Here’s what mine looked like — your numbers will be different.
- Images dumped at the vault root. I had 672, with no folder of their own.
- Frontmatter that isn’t useful yet. That’s the metadata block at the top of each note. Every note had an
onenote-idand nothing else: no tags, no dates. - Almost no links between notes. I had one genuine cross-note wikilink (
[[like this]]) in the entire vault. OneNote sections don’t become Obsidian links. - Formatting noise. Escaped angle brackets (
\<like this\>),==highlight==markers from the export, numbered lists that no longer number. - Empty stub notes. Pages that existed in OneNote but had no body (19 in my dump, plus a few folders that only existed to hold them).
- A pointless extra path. Everything sat under
OneNote/2nd Brain/, so the real topic folders were two levels too deep. - Nothing configured in Obsidian. No tags, no templates, no Daily Notes settings pointing at the dated notes I already had.
Open Graph view now. It’ll look sparse: a cloud of unlinked dots, maybe a couple of accidental links. That’s the “before” in the video above. It should look a bit more organised once you’ve added index notes later.
Make a short list from your dump before you start moving files. The next two sections are easier if you know whether you’ve got 20 images or 700.
Work on a copy of the vault folder until the tidy-up looks right. Moving and deleting notes is hard to undo if you haven’t put the vault in git yet.
Immediate fixes
Start with the boring stuff. None of this is about how you organise your thinking. It just makes the vault less annoying to open.
Put attachments in one folder
Create an attachments/ folder at the vault root and move the image files into it. Obsidian finds embedded images by filename, so ![[some-image.png]] keeps working — you don’t have to edit every note.
In Finder or File Explorer that’s a select-and-move. From a terminal, something like:
mkdir -p attachments
mv *.png *.jpg *.jpeg *.gif *.webp attachments/ 2>/dev/null
Change the extensions if your importer used different ones. Open a note that has an image in it and check it still shows before you continue.
Strip export artefacts
Search the vault for \< and \>. In my dump that was 1,101 backslash escapes across 118 files. Replace \< with < and \> with >.
Obsidian’s search can find them. A folder-wide replace in a text editor is quicker, once you’ve checked the pattern is leftover export junk and not a code snippet you meant to keep. Then search for == and decide whether to keep the highlight markers or turn them into bold, or nothing.
Numbered lists that restart at 1. on every line are the same kind of job: fix them when you next edit that note, or tidy the worst files now.
Delete empty stubs
Open notes that have no body — often only the onenote-id frontmatter. If they were accidental OneNote pages, delete them. If they were placeholders you still want, leave them and add a one-line description so they don’t look like leftover empty pages.
After deleting, remove any folders that are now empty.
Flatten the path prefix
If every topic folder sits under OneNote/<Notebook name>/, move those topic folders up to the vault root. In my vault that meant 13 top-level folders sitting directly in the vault, instead of two extra layers of “this used to be a notebook”.
Rename in Obsidian rather than the system file browser if you’ve already created any wikilinks — see automatic link updating below, and turn that setting on before you move things.
Structure
The vault should now open without a pile of images at the root. Next, give the notes some metadata you can actually filter on.
Point Daily Notes at the notes you already have
If you already have dated notes, don’t start a second dating system. Set the Daily Notes core plugin to match what you’ve got.
Mine lived at TODO/YYYY.MM.DD. The settings that made them usable:
- Date format matching the filename (
YYYY.MM.DDin my case) - New file location set to that folder (
TODO)
Install the community Calendar plugin so those dates show in the sidebar. I had 74 daily notes that went from “files in a folder” to “click the date” once this was set.
If you don’t have dated notes yet, skip this and add Daily Notes later. Don’t create empty ones just to fill the calendar.
Turn on automatic link updating
Settings → Files and links → Automatically update internal links. With this on, renaming or moving a note in Obsidian rewrites every wikilink that pointed at it. Turn it on before the next section, where you’ll create index notes and will want to rename things without breaking them.
Using the vault with AI tools
This is the other reason I moved. Markdown is just files. There’s no special format, no API to wrangle, no export step. An assistant with access to the folder can read, search, and write notes directly. Tags and MOCs mean it can get its bearings without opening every file.
The steps below are what I’d do on a vault I expected to share with a teammate, or to point Claude Code at. Do them once the tidy-up above feels settled. Skip the whole section if you don’t care about this.
Add a VAULT.md at the root
This is the first file I’d want an assistant to read, and it’s useful for humans too. Same idea as a README (the file that explains a project), or a CLAUDE.md in a code repo: one file that explains how the vault is laid out.
Include:
- what the top-level folders are and what belongs in each
- the tagging rule you actually use
- where daily notes live and how they’re named
- where the MOCs are
- anything an assistant shouldn’t do (for example: don’t delete notes, don’t rewrite history)
Add _PROJECT.md notes for active work
For each project you’re actively working on, keep a note of the current status, decisions you’ve made, open questions, and links to related notes. That’s the useful stuff to give an assistant (or yourself) at the start of a sitting, instead of re-explaining everything. Name them the same way each time (_PROJECT.md in the project folder, or a Projects/ folder with one note per effort) so they’re findable.
Daily notes then work as a diary. An assistant can read the last few to see what you’ve been doing.
Put the vault in git
If you care about history you can actually diff, a private git remote is more useful than relying only on Obsidian Sync. Merge conflicts in markdown are readable. In OneNote, not so much.
A reasonable starting .gitignore:
.obsidian/workspace.json
.obsidian/workspace-mobile.json
.obsidian/graph.json
.trash/
Commit the rest of .obsidian/ if you want plugin lists and settings to travel with the vault. Push to a private remote.
Useful commit messages (“Added notes from Docker workshop”) give you a changelog. Don’t expect 47 auto-saves to mean much later.
Keep tagging as you go
The tags only help if new notes get them too. When you add a note in Developer/LLMs/, put [developer, llm] on it while you’re there. Otherwise the filters slowly go off.
A condensed quickstart. I found Nick Milo’s 15-minute walkthrough a good way in, once the vault is in decent shape:
created dates in frontmatter. Useful if you want to tell old notes from new ones. A 2024 note about a tool you don’t use any more is less relevant than something from last week. You can fill these in from file modification times as a rough guess.
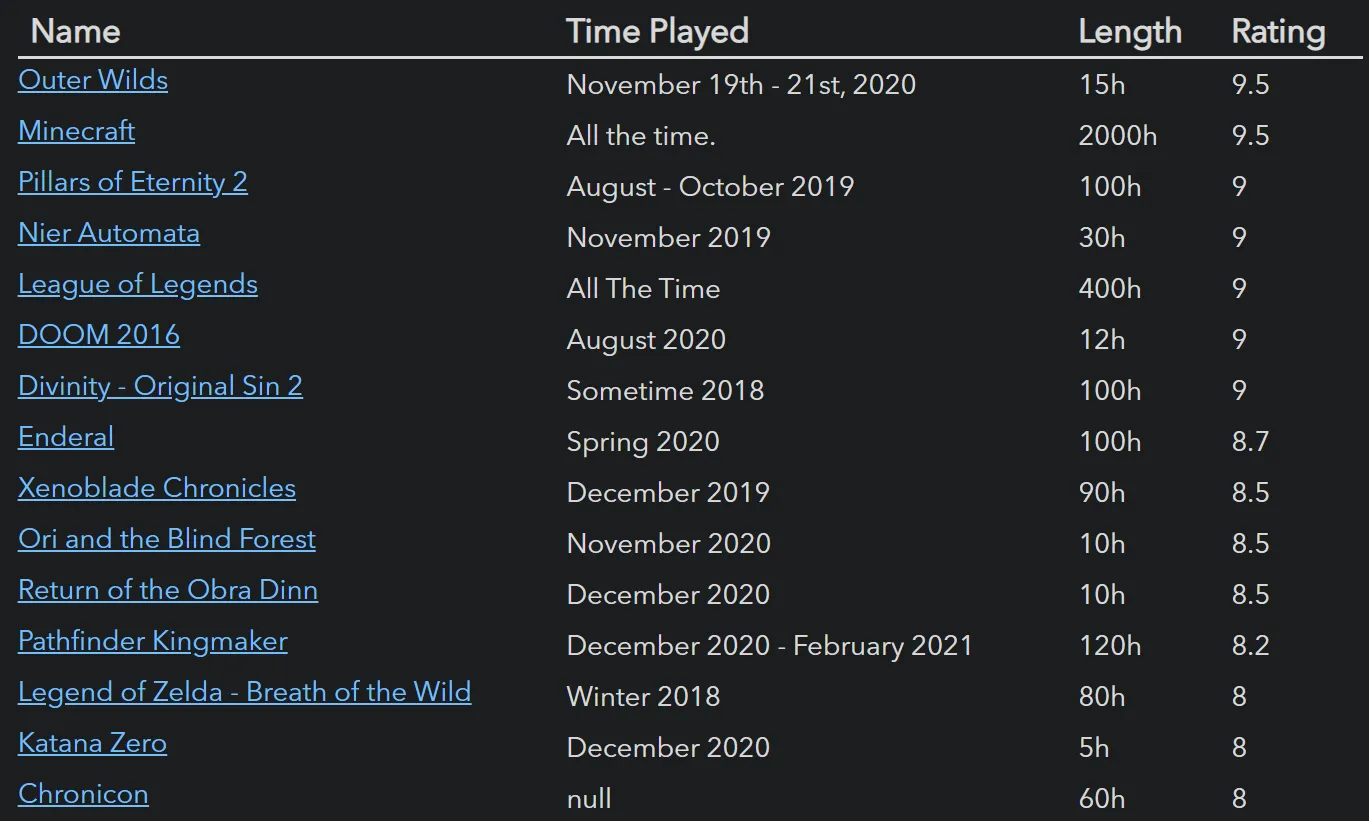
Dataview. Once enough notes are tagged, the Dataview community plugin can build lists and tables inside a note from a query. Something like “all [developer] notes changed in the last 30 days”:
```dataview
TABLE file.mtime AS "Last modified"
FROM #developer
WHERE file.mtime >= date(today) - dur(30 days)
SORT file.mtime DESC
```
That turns into a live table of links, not a list you have to keep up to date by hand. The screenshot below is from the Dataview docs — same idea, with a games folder instead of developer notes.
Handy for you, and a short summary for an assistant. Install it after the tagging rule has settled, not before.
Wrap-up
You should now have:
- a vault of markdown, not a OneNote notebook
- attachments in one place
- tags you can filter on, instead of
onenote-id - Daily Notes (if you had dated pages) wired up to the Calendar
- MOC notes, and a graph that looks like it has a shape
- optionally, a
VAULT.md, project notes, and git history
Things you can do that were a pain in OneNote: search the whole vault without already knowing the notebook; rename a note without breaking everything; point an assistant at a folder and have it read the same files you do.
This isn’t a tour of note-taking methods, and it isn’t a list of every Obsidian plugin. The tidy-up takes a while, but you only do it once. After that you’ve got notes you can search, rename, and if you want, point an assistant at.